| |
Kit Items for Inventory
| Back
to index |
Description |
Documentation |
Technical |
| |
|
|
|
|
General
Info:
|
Kit Inventory Items provides the capability to combine several
items into a single item for sale. The items can be combined
and the new item created in file maintenance, or they can
be maintained separately and combined during the sale. The
pieces can be predetermined and fixed, or they can be changed
during the sale.
The kits are items in the inventory file. All the standard
tracking that applies to other items also applies to kit item.
Kit items can either be Stock or Non-stock inventory items.
The type of item determines the level of flexibility during
sale and how they are built into stock. Stock items are set
up before the first sale and the configuration is permanent.
Once a kit is sold, it is no longer possible to change the
kit configuration. Non-stock items are set up in advance but
they are built during the sale. Since they are built during
the sale, and they can be changed, they cannot be returned
without manually adjusting the components.
There is considerable flexibility in how the kits are set
up. Items in the kit can be set up as optional or mandatory.
Optional items can be included or not during the sale, as
needed. Kit items can be priced manually, or they can be set
up to compute the price based on the sum of the components.

|
| Setup: |
To create a kit, select Kit Maintenance from the Extension
Menu in either accounts receivable or sales orders. Enter
the number and either select an existing kit or add a new
one. If the item number already exists in inventory it can
be selected and used for the kit. If the item is not in
the inventory file, the opportunity is provided to add a
new inventory item. Once the item is added the screen in
Figure (1) will be displayed.
- List Type: (Items/Descrip/Line items): Determines
how the item will print on invoices and sales orders.
Press
- I - to list the individual components of the kit
- D - to use the six line description to the right
- L - to use the standard line item description in the
inventory file.
Price Update From Components: (Y/N) Determines how the
item price for the item will be computed.
Press:
- Y - to use the total price of the individual components
of the kit.
- N - to use the price entered in file maintenance for
the item.
Minutes To Complete Each Kit For reference purposes only.
Economic Batch Quantity: For reference purposes only. Assembler
to Produce: For reference purposes only.
Once the basic information has been entered the kit will
be saved and then it is possible to add the components.
Once saved the choices at the bottom of Figure (1) will
be displayed. To select a choice press the first letter.
Press:
- E - Edit the information about the kit as mentioned
above.
- D - Delete the kit.
- P - Print the kit component information including onhand
information.
- L - Line items. Enter and select items that will be
components of the kit
- N - New kit. To create a new kit from this kit, start
by adding a new inventory item through inventory maintenance.
Once the item has been added, select new kit and enter
the item number. A new kit will be created with the same
components and information in the kit being copied.
- A - Assemble. This choice will be available for kits
of stock items and this is how the assembly is recorded.
- F - Forward to the next kit
- B - Back to the last kit
- Q - Quit
When Line items is selected and no items exist the choices
will be to add or quit and a blank screen of components
will be displayed. Once one or more items have been added
a screen similar the one depicted in Figure (2) will be
displayed.
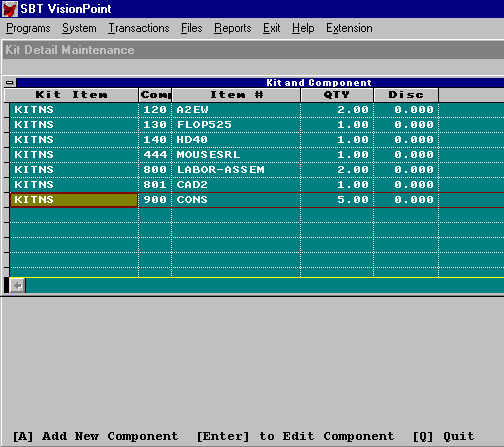
- Enter Choice (Add/Delete/Edit/Fwd/Back/Quit)
- Press A - Add new components to the list.
- D - Delete components from the list.
- E - Edit information about the components of the
kit. See figure (3) for more detail.
- F - Forward to additional pages if there are any.
- B - Back to previous pages.
- Q - Quit and return to the kit screen.
As new items are entered the list will be displayed. If
a new component is added, or an existing item changed, the
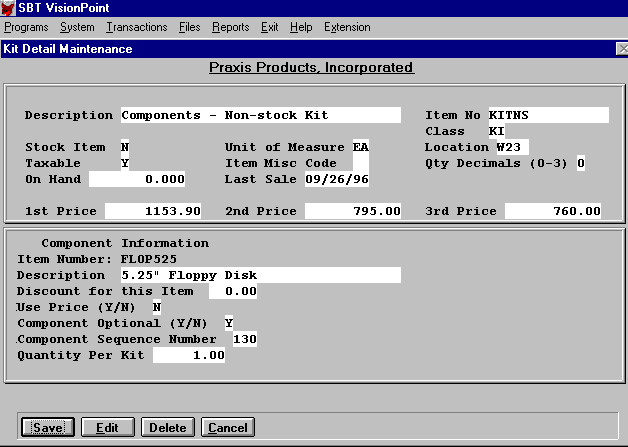
window displayed in Figure (3) will be displayed. Each item
(component) must first be in the inventory file to be included.
The choice to add new items to the inventory file is not provided
during this entry.
|
| Component
Information : |
Enter the detailed information about each of the components.
This information determines how the kit is priced and how
it is sold.
- Item Number : Item number previously entered (display
only).
- Description : The description defaults from the
inventory item with the same number. Changing the description
here will only alter it for this kit and will not change
the inventory item itself.
- Discount for this item: Discount percentage to
use if pricing the total kit based on the components.
- Use Price (Y/N): Select Y if this item is to be
used in calculating the price of the kit.
- Component Optional (Y/N): If the item is a non-stock
item and the component is optional, the choice will be provided
during the sale to exclude the item from the kit. If it
is excluded, it will only affect the one sale and will have
no affect on the basic kit configuration. If the component
is not made optional, it will not be able to be excluded
during a sale.
- Component Sequence Number: This number is used
in several printouts to determine the order in which the
components are listed.
- Quantity for Kit: How many are included in a single
kit.
|
| Sales
Entry: |
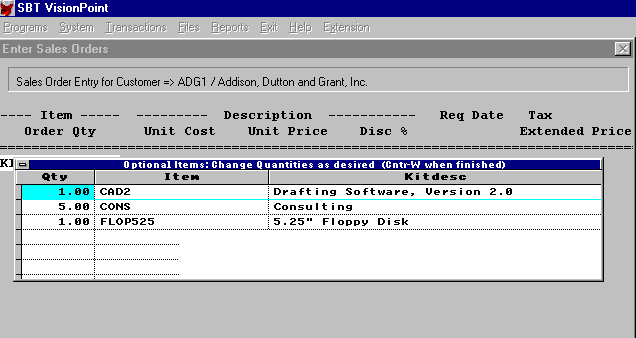
Non-Stock Kits
As mentioned above, non-stock kits can be further defined
during the sales entry. If a non stock kit is set up with
optional items , and it is selected during sales entry, a
window will pop up as depicted in figure (4). At this point
the optional components will be displayed and can be changed
to zero if desired, or increased in quantity. The order will
take the changes into account when the order is completed.
It will allocate one kit to sales in the inventory file. Selected
components will also be allocated in the quantities entered.
When the kit is shipped or invoiced, it will have no effect
on the inventory quantity of the kit item, but the quantities
for all the components will be updated, and the allocated
quantity of the main item will be reduced.
Once a line item has been saved the following prompt will
be displayed at the bottom of the screen.
Press:
- C - Change the configuration if non-stock.
- V - View the standard configuration.
|
| Editing
Non-Stock Sales: |
Once an order is entered it is possible to go back and change
the configuration, as long as the kit has not been even partially
shipped. Once the item has been partially shipped the configuration
can no longer be altered. As with all invoice items, the kits
cannot be changed once the invoice is complete.

|
| Stock
Kits: |
Unlike
non-stock items, the configuration of stock items cannot be
changed once sold. Once an order is entered it is possible
to go back and change the configuration, as long as the kit
has not been shipped or built. Stock items are assembled through
the file maintenance menu.
|
| Reports: |
- Kit
Listing
- List
of kits in the system.
- Item
Number : Enter Item number or leave blank to print all.
- Type
of Kit (Stock/Non-stock/All)
Press:
- S
- Stock Kits Only
- L
- Non-Stock Kits Only
- A
- All Kits regardless of type
Type
of Report (Summary/Detailed)
Press
- S
- Summary report only, does not show the components.
- D
- Includes the components
Kit Component
Listing
List
of kits in the system with more detailed information about
the components.
|
top
|
 |
| |
 |
All contents Copyright © 1996-2001, Integrated Business Solutions
|