|
Go to customer or vendor file maintenance. When maintaining
the customer or vendor file there is a message at the bottom
that says:

Notice the new selection for More. This selection is provided
to allow more selections. Once the More selection is
made a new set of choices will be provided depending on installed
software. One of the new choices is Sendfax.

By pressing S the fax process is initiated. FAXTOOL
knows the fax number because it is on the customer file. The
contact name is pulled from the file and a screen similar
to the one below will be displayed.

- Recipient: Shows the code and company the fax will
go to.
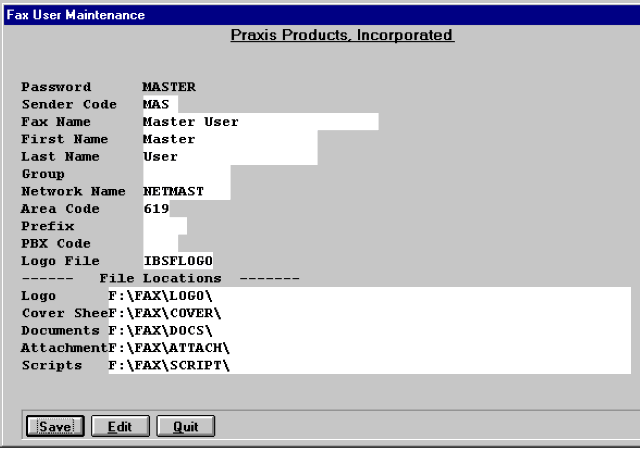
- Sender Code: The sender code is set up to allow
users of Corporate Contact Manager to enter the representative
ID.
- From: Who the fax will show it is from. This originates
from the sender's file and is covered below in setup. It
can be changed from this screen.
- To: Name to put on the fax.
- Date to Send: If it is to be sent at a later date
that date can be entered.
- Time to Send: If it is better to send the fax late
at night to take advantage of the less expensive rates the
later time
- Fax Number: Complete fax number to send to. If
a prefix is needed in addition to the number it will be
assigned from setup.
- Quality: Standard or Fine.
- Logo File: Name of the logo file if used. The location
where it is stored is part of setup.
Once the basic information has been entered or approved
the additional selections can be made.
As displayed above the following choices are made available.
Press:
- E- Edit the information mentioned above.
- A- Add attachments to the fax.
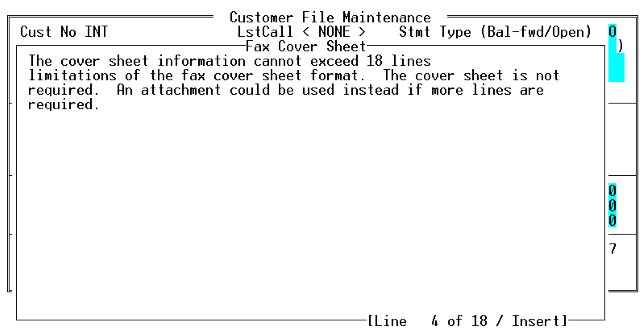
- C- Enter or import information to print on the
cover sheet. The cover sheet is optional if there are attachments.
- S- Send the fax.
- Q- Quit without sending the fax.
- Attachments: Selecting attachments the first time will
provide the following choices:

To add a single file when it is known what the name is and
where the file is located it may be easiest to enter the name
and location of the file. Once the file is selected a screen
like the one below will be displayed. This screen shows the
files that have been selected to send.

The files listed can be deleted or new ones added. If one
of the items on the list is selected it can be deleted from
the list. When [Esc] is pressed the additional choices noted
above will be provided again.
When multiple files will be pulled from the same directory
it may be preferred to use the file directory method. To do
this select the List Directory choice and you will be prompted
for the directory to list. If a valid directory is selected
it will list the contents for you as depicted in the picture
below. To select one just use the arrows and select the one
desired by pressing . Files can be anything faxable,
such as PCX files, DCX files and text files.

When all attachments have been selected, press Q
to quit and be returned to the first screen. At this point
each of the above choices is again available. The attachments
can be changed again, or the cover sheet can be edited.
Cover Sheet
Cover Sheet: Press C and the cover sheet can be imported
from another file or edited from scratch. The window that
pops up utilizes word wrap features to make it easy to edit
and change the form until finished. When finished, press F10
and once again you will be returned to the main screen.
Send
Send: Once the cover sheet is ready and the attachments
are all selected the only step remaining is to send the fax.
Once this choice is made, the fax will be added to the queue
automatically.
|